I want #OrganicMilkNext!
I know I'm certainly not the first to confess my love for Starbucks. For years, I've exercised my purchasing power to drink a Grande Americano over anything served in styrofoam from the coffee shop that claims America runs on their beverages. Overall as an organisation, I will give credit to Starbucks for being an environmentally conscious and community minded business. For example, I can go to my local Starbucks and pick up coffee grounds to use as compost in my garden. However, there is ALWAYS room for improvement. At the end of the day, Starbucks is a mass-production coffee house, there's no getting around that.
In order to ensure that the large production scale Starbucks is providing us with is as green as possible, there must be more attention paid to the ingredients going into their ingredients. What I'm getting at; it's time to start using organic dairy milk in the process of making our coffee, please!
While not genetically modified themselves, dairy products are not immune to the insidious impacts of GMOs. Cows living in concentrated animal feeding operations (CAFOs) are fed a grain diet comprised almost entirely of genetically modified corn, soy, alfalfa and cotton seed. These crops degrade the quality of our land and water, perpetuate corporate-controlled agriculture, and have potentially negative health impacts on livestock. Additionally, the overuse of antibiotics in industrialized farming is contributing to the spread of antibiotic-resistant bacteria, putting us all at risk. (source: EcoWatch)
While Starbucks has already made progress by providing us with organic soy milk and rBGH-free dairy (read: no more growth hormones), they must set the same standard for dairy milk by providing us with organic, environmentally and socially conscious products.
You can view and sign the petition to Starbucks CEO, Howard Schultz, here:
Tell Starbucks to Serve Only Organic Milk From Cows Not Fed GMOs
Showing posts with label organic. Show all posts
Showing posts with label organic. Show all posts
Sunday, October 5, 2014

Monday, June 23, 2014
Everett Street Garden
Four friends from high school asked me to build them a garden in their backyard. Adjacent to a large cemetery, I quickly found that the condition of the soil was going to be very easy to work with. Additionally, the spot we chose for the garden get's a serious 9-10 hours of sunlight daily (which can be too much for some plants) but is certainly a good amount of sun for a new vegetable garden.
Here's what the area looked like as I started to get the ground prepared.


Next, it was time to start building up. First, a few layers of leaves and newspaper.

Here's what the area looked like after a few layers of all that organic matter. The inks from the paper might not be the best for the garden, but the paper will break down naturally over time and help condition the soil by keeping in additional moisture.

Finally, I built up small areas of soil where I planted the initial bunch of veggies; I filled in the other areas with leaves, knowing that I would be adding more soil, compost, manure, etc. to the garden in due time.


Here's what the area looked like as I started to get the ground prepared.
After taking off the layer of grass and moving that aside to continue growing on the lawn, I forked the entire area to get some air and light into the ground. Although I planned to build a no dig garden, I did want the bottom of the garden to be as arid as possible.
Next, it was time to start building up. First, a few layers of leaves and newspaper.
Here's what the area looked like after a few layers of all that organic matter. The inks from the paper might not be the best for the garden, but the paper will break down naturally over time and help condition the soil by keeping in additional moisture.
Finally, I built up small areas of soil where I planted the initial bunch of veggies; I filled in the other areas with leaves, knowing that I would be adding more soil, compost, manure, etc. to the garden in due time.
This is still a work in progress, but here's what the garden looks like most recently; currently growing in the garden: tomatoes (three varieties), capsicums (three varieties), green beans, snap peas, eggplant, parsley, cucumber, zucchini, watermelon, radishes, lettuce, arugula...
Friday, June 20, 2014
Mullumbimby Community Garden Needs Your Help!
Mullumbimby Community Garden now has a crowdfunding campaign on Chuffed...Find out more HERE
DONATE HERE
DONATE HERE
Do you know what it feels like to lose an unsaved document on your computer? Everything you've worked hard to complete; lost, in the blink of an eye.

Recently, some very dear friends of mine had those feelings amplified during the course of one night. The Mullumbimby Community Gardens, where I spent three months volunteering (February through May) lost all of their administrative belongings when fire wreaked havoc on their office. Fire damage also affected other areas of the gardens including the Nursery, the Rotunda, and the Seed Savers Shed; all vital parts of this thriving organisation. Eight years worth of records, files, photocopiers, and other electronic devices were destroyed.
 |
| Photo courtesy of Mullumbimby Community Gardens |
 |
| Photo courtesy of Echo NETDAILY |
 |
| Photo courtesy of Mullumbimby Community Gardens |

 |
| The nursery is a vital part of the MCG; seedlings are sprouted for use within the gardens and are also grown as a way to provide a small revenue stream for the gardens |

The Bunya Sustainability Fund has been an effective method of raising money for help around the gardens. Now, more than ever, the MCG needs your help. Please make a tax deductible donation today and help the Mullumbimby Community Gardens pick up the pieces and continue preparing for this year's upcoming events.
Tuesday, June 17, 2014
A Cool Small Town
Collinsville (Connecticut) is full of all sorts of gems. Growing up in the neighbouring town, I was always familiar with the expansive antiques shops, LaSalle Market, and the picturesque views of the Farmington River. Another great attraction in this historic village is a seasonal farmers' market that takes place during summer and early autumn months.

When: The market operates from June 8th until October 19th (tentative). Every Sunday, rain or shine, you can enjoy the market from 10am to 1pm.

What: You can enjoy shopping for produce (fruits and veggies) from over a dozen local farms. Also on offer, unique products all made from CT grown produce and dairy, from which the farmers make cheeses, spice mixes, flowers, herbs, and much more.

Where: The Collinsville Farmers' Market takes place at the corner of Rt 179 and Main Street (in the Town Hall parking lot). It's located just across the street from the Canton Historical Society (lots to discover there).

All information courtesy of the Collinsville Farmer's Market
All photos courtesy of photographer Paul Kovaleski
Thursday, April 24, 2014
Radish and Pepper Overload
Capsicums grow really well in my garden. I don't know if it's the climate here, or the soil composition (high nitrogen) in the raised beds; maybe it's a combination of both. What it equals is constant sensory exploration (read: test how much spice the human body can tolerate!). These habanero peppers turned into a few bottles of chili sauce...that recipe is still under construction.

Radishes and other varieties of capsicums (7 in total growing in the garden) also grow really well. When life gives you radishes and peppers, you make something with them...here's a recipe for Radish and Pepper Spread.

The green capsicums were all sliced and baked in the convection oven for roughly 30 minutes at 180C. I covered the lot of peppers in water and two tablespoons of sugar while they were baking.

After the peppers came out of the oven, one juiced lime, a tablespoon of olive oil, and a pinch of salt was stirred into the bowl.

Finally, add the diced radishes and red chilli peppers and you've got a delicious spread with a kick.

Try it on lentils...

...or on toast.

However you decide to spread your radishes and capsicums, enjoy!
Thursday, January 23, 2014
Deep Dish Mango Pie
Before leaving Australia two weeks ago, I took advantage of the abundance of mangoes we have ripening on the tree outside of the house. A hot spring with below average rainfall stunted the growth of the mangoes, and they're not as large as past years; but it also means they matured and began to ripen more quickly. This is a mango recipe that I made up as I went along, but the finished product is so worth it.
Deep Dish Mango Pie
To start, get a pie dish, the deeper set the better. Add a spoonful of butter and a teaspoon of sugar to the dish, and melt inside of your oven...

For this recipe, I used three ripe mangoes; four may have been a better go but I worked with what I had at the time.

An easy way to cut mangoes it to make two cuts, slightly off center, leaving the seed with a small sliver of skin around it. Dice the mango (with the skin still on) and you can easily scoop the chunks out with a spoon (similar to cutting up an avocado). Another great part of cutting the mango this way is that you can remove the skin from around the seed, and enjoy the tasty bits that stick to the seed.

Next, you'll need a large mixing bowl. In it, you will add in the three diced mangoes, 2 (or 3) spoonfuls of sugar, and 1/2 cup self-raising flour. Mix these ingredients together.

Now you'll take the contents from the bowl and add them into the deep dish (containing the butter and sugar combination). Mix all of these together in the pie dish. Now you'll need to get a smaller (oven-safe) dish to melt an additional two spoonfuls of butter (not pictured).

Back to the mixing bowl, you'll combine 2 spoonfuls of sugar, 1/4 cup self-raising flour, 1/4 cup milk, 1 teaspoon of cinnamon, 2 drops of vanilla essence, and the 2 spoonfuls of butter you just melted.

Pour the mixture from the bowl into the deep dish...

...and lightly mix the entire combination.

I choose to bake most of my dishes this size in a smaller convection oven. In the event that you like consuming more energy, and using your larger oven, go for it. In either case, you'll need an oven set to 180C (around 350F). After ten minutes, I sprinkled a bit of sugar on top to enhance the browning process.

After 35 minutes (total baking time) you'll find a perfectly browned pie waiting in your oven. I did not preheat my convection oven, so the pie took 35 minutes...if you decided to preheat your oven, check to see the pie is not ready after 25-30 minutes.

Enjoy...and please leave some feedback about your baking experience after trying this recipe!
Monday, December 23, 2013
Royal Veggies
The Royal Botanic Garden in Sydney has been collecting and studying plants since 1816. Nearly two hundred years later, the gardens spread a massive 30 hectares south of the Sydney Harbour and house over 15 different feature gardens. The first time I experienced the garden in 2012 I simply enjoyed a stroll around the park, as I made my way from The Rocks to Woolloomooloo. Recently, as I showed my friend Carolyn the gardens for the first time, we stumbled upon the the vegetable gardening efforts currently going on in the park.

These raised beds are a great size and shape for easy maintenance. Plants can be easily separated by size and variety. I can't say I'm a huge fan of growing Papaya trees in raised beds, as I've gone through the process of removing them from my raised beds at home already. However, there's plenty of room here and nearly a dozen raised beds so using one for some fruit trees works.

My favorite part of the garden, and what really caught my attention to document the project were these massive tomato trellises. Around the base are about 10 different tomato plants, ready to take on the summer sun and use these structures to grow as tall as can be. Tomatoes love support as they grow, and this setup really lets them reach their full potential.

Another great project going on here, and something I have yet to adopt at home, is worm farming. As the sign reads, worm farming is easy and great for producing healthy organic fertilizer to be used on all of your plants.

And last, but certainly not least, composting!

These guys use multiple processes in their composting efforts, similar yet different to the multiple steps I use at home. Here they use an open wooden container to collect their garden scraps and rubbish where the green matter breaks down before being added to the compost bins.

It's really important to see projects like this set up in a botanic garden. Quite often gardening organizations forget about the importance of growing your own fruits and vegetables, and get lost in the pretty trees and fragrant flowers. Amongst all of the beauty and flowering, there's plenty to learn while exploring the Royal Botanic Garden in Sydney.
Thursday, November 21, 2013
What's For Dinner? (First Zucchini Harvest)
About a month ago, Guy discovered a heap of rich soil that was dumped as extra when the raised vegetable beds were first installed here. The soil has been covered by weeds, molasses grass, and other debris for years, until it's potential was recently discovered. I'll have to go back and take some photos of what's growing up there (corn, watermelon, spring onions, zucchini, cucumbers, tomatoes, etc...). For now, we've got our first zucchini harvest with a bunch of beans. The zucchinis are a bit on the small side, but they were beginning to turn yellow so I wanted to take off this first group, so I can give the plant room to grow and energy for the forthcoming veggies.


Sunday, November 10, 2013
Room For More
There's a lot of open space on this property, and a good amount of it is north-facing. I've been taking the opportunity (and most of the open space) to transform this land into a food-production haven. Recently I've been feeling like no day is complete if I haven't planted something new beneath the earth's surface. My goal is to continue this progress for as long as possible, no matter where I am (this might change as soon as I get on my next flight). All you need to get started:
Empty pots or containers...check

Seeds...green beans and paprika pepper

Soil mixture...compost, horse manure, 5IN1 fertiliser

I filled the small square containers 80% with the soil mixture, dropped a seed around the middle of the container, and then filled another 10% of the container, so there's room to put mulch or more compost when the seedlings sprout.

The paprika peppers went into 6-in-1 containers, which are usually more ideal for lettuces or chards. I'm a pretty keen observer of the development of my seedlings, I'll make sure whatever sprouts up doesn't outgrow it's container. Below, you can't tell there are six individual slots for seedlings, but everything is covered with the soil mixture.

Now it's time to find a sunny spot to let the seedlings rest and start growing. If you can tell from the background of the image (below) you'll see this is a really steep hill (a good 50 degree slope in some spots). Ive made a terrace recently, and two new 'raised' vegetable beds for cucumbers and onions. Those seeds went in two days ago, so we're still waiting on them to come alive as well.


I gave these guys a quick drink so they wouldn't dry out completely in the hot afternoon summer sun...but I'll be back tonight to water the whole area...and then tomorrow, and the next day, it never ends.
And from above...two new vegetable beds with green beans and paprika pepper ready to sprout below.


Seeds...green beans and paprika pepper

Soil mixture...compost, horse manure, 5IN1 fertiliser

I filled the small square containers 80% with the soil mixture, dropped a seed around the middle of the container, and then filled another 10% of the container, so there's room to put mulch or more compost when the seedlings sprout.

The paprika peppers went into 6-in-1 containers, which are usually more ideal for lettuces or chards. I'm a pretty keen observer of the development of my seedlings, I'll make sure whatever sprouts up doesn't outgrow it's container. Below, you can't tell there are six individual slots for seedlings, but everything is covered with the soil mixture.

Now it's time to find a sunny spot to let the seedlings rest and start growing. If you can tell from the background of the image (below) you'll see this is a really steep hill (a good 50 degree slope in some spots). Ive made a terrace recently, and two new 'raised' vegetable beds for cucumbers and onions. Those seeds went in two days ago, so we're still waiting on them to come alive as well.

Here's a view of the second new veggie bed, with three other new seedling (bean and paprika) containers below.

I gave these guys a quick drink so they wouldn't dry out completely in the hot afternoon summer sun...but I'll be back tonight to water the whole area...and then tomorrow, and the next day, it never ends.
And from above...two new vegetable beds with green beans and paprika pepper ready to sprout below.

I feel like I've certainly accomplished my mission of planting something new today...what have you planted recently?
Sunday, November 3, 2013
What's For Dinner?
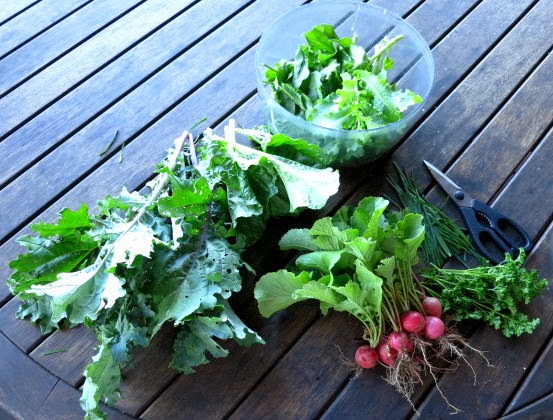
It's been a while since I've done a feature on What's For Dinner?...here we have a sampling of some greens and veggies to add into tonight's mix. Radishes are still growing really well here. It's simply a matter of planting some seeds, waiting a few weeks and then planting some more seeds; that way there's always a crop to be harvested. Some parsley and chives to add some flavour to the relatively bland kale. Some silverbeet that I stir fried with the kale, and some lettuce for a salad. Organic gardening is so easy, and tastes so good!
Subscribe to:
Posts (Atom)

